Good Morning Friends! If you can remember back to last June- Ian and I started renovation on our 2011 Jayco Jay Flight Travel trailer. Check out the start of that renovation here in case you missed it. Over the past year I’ve been instagram-ing bits and pieces of our renovation, but not revealing the entire thing, and I’m happy to say it’s finally here! I feel like I owe you guys an apology for making you wait SO Long! BUT, filming weddings every weekend that we aren’t camping and filling all the non-wedding weekends with camping- It’s been HARD to finish anything! Then to find time to photograph the camper in it’s perfectly clean not-being-used condition with two boys always in tow? Forget it.
Without making you wait any longer- grab your coffee and read on!
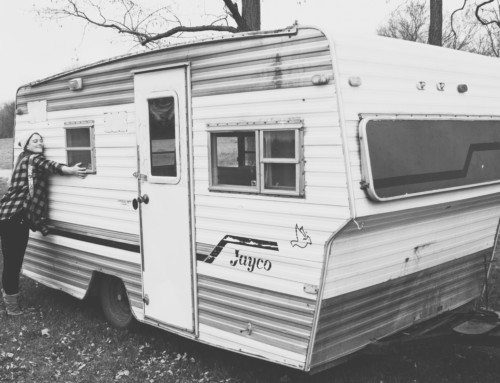
We started out in 2011 with a stock Jayco Jayflight 26BH. We bought it brand new, and it was perfect. Except- you know the brown. All that brown. Its basically everywhere. If it all matches it’s perfect right? Not so much.

We started with just the bedroom, and then, we quickly learned that the rest of the camper just looked bad. I mean- I don’t even want to look at that side of the camper bad. Here’s a little glimpse into the new room from the old room.


It all had to go. Now. We started with our least favorite thing- That couch. It turns into a bed, and adds sleeping room- but we really don’t ever have that many extra guests, and if we do- we can shuffle the boys around. Getting to our room required walking through a tiny path next to that couch. It’s ugly and it’s in the way. So we voted it out. But then- That wall- It was still in the way, and looked out of place now. So that had to go too.
We weren’t really aware of what was under the couch, but we knew we wanted to build some sort of bench in that corner so we figured we could work around the electrical/heat in the corner. Ian removed the old box, built a new frame for a bench, and then we covered it and added a hole for ventilation. After paint, it almost looked like it had always been there, and left us much more room!


After the bench was built, we started to paint. Painting took forever. Painting camper walls without priming is a huge NO. Don’t do it. It’s not worth the skipped step and you will be re-painting. We started with Zinsser Cover Stain Primer. This gave the walls a good base coat and a sticky surface for the paint to hold. After the primer was dry, we went with a neutral grey. We wanted the camper to feel light and airy but not be completely white. I used Benjamin Moore’s Stonington Grey. We’ve used this in our house as well, but to save some money, we have it color matched at Home Depot and went with Behr paint. I like it just as well and it will save a few dollars.
Painting the cabinets was going on at the same time, and is always a huge task. We removed all the hardware, primed everything in the same primer, and then covered it with a cottage white paint from Home Depot made for cabinets. We purchased new hardware, and it started looking like a brand new place!

Once the walls and cabinets were brightened up and most of the brown was gone, the floors looked really brown. Somehow more brown than they did before. We realized we were not going to be able to leave the floors if we were going to go all out with this renovation. We searched for a good flooring and went with a vinyl flooring for ease of installation, amount of wear and tear, and possible water exposure. We wanted to use this all the way throughout the trailer, and I didn’t want any type of wood in the bathroom or around the sink. The floor went in pretty easily once Ian got the hang of it and it is just beautiful. All credit goes to Ian on this one. I didn’t do a single piece of it. (I was still painting)

We wanted to add a litlle something to make the kitchen “pop”. We decided to go with a backsplash around the entire area. We found 12×12 square stick backsplash at Home Depot. I’ve seen this stuff popping up in travel trailers a lot, and for good reason. It’s super easy to cut, and easy to install. It’s also light, which is ideal for a trailer.

The bathroom in this (and most) travel trailers is tiny. There is a mirror with medicine cabinet, which takes up basically all of the space in the bathroom area. We don’t bring a ton of bathroom items with us while camping, and we have plenty of storage under the sink, so we decided to do away with the cabinet portion. Instead of buying a new mirror, we took the mirror off the cabinet, painted it, and re-mounted it on the wall.


After all of this, we did a lot of touch up paint, more paint, and more painting. There was some trial and error- I thought I’d paint the fridge with chalkboard paint, but it just looked like a black fridge in the middle of a nice white kitchen, so that got re-painted white to match the cabinets.
There was a lot of shopping at Target of course for new bedding, and little touches to make it cozy. Almost all of the signs and little pieces throughout the trailer are either Target or Hobby Lobby.
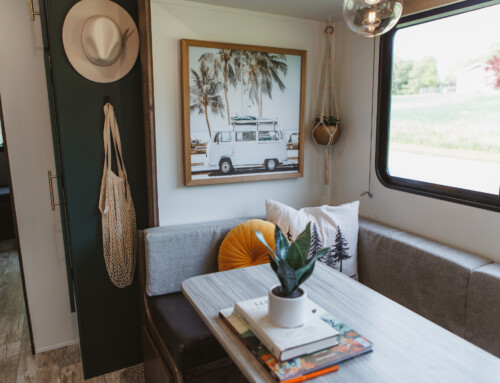
I made my own cushions for the new bench, and covered the old cushions at the dinette. I found a sweet pretty grey fabric with white arrows at Hobby Lobby that just seemed perfect. I used a duck fabric so it was durable.
Once we could finally put all of the fun accents in the rooms, make the beds, and put it all together, I started to see my vision for this space come to life, and it was beautiful.


I did the boys bunks in Pillowfort by Target. Target continues to come out with great kids bedding, and this stuff is no exception. Ethan wanted sharks, and Nolan wanted woodsy animals, and I think they actually go together well!
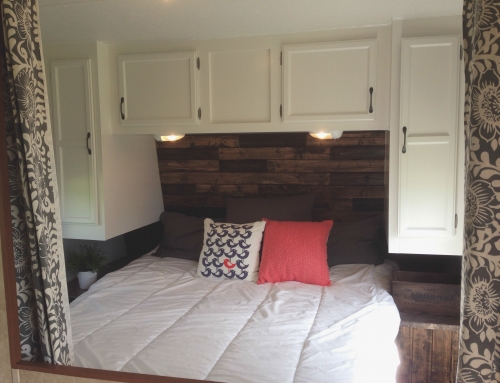
Around the bottom of the beds there was an ugly (surprise) brown which we covered with wood just as we did around the master bed. We also did the headboard of the master bed this way. See this post on the bedroom for how we cut and stained these boards.

Last but not least- those decals on the outside had to go. I’m not going to lie, we’ve only gotten two sides off. This stuff is not fun to remove, and it takes forever. It’s literally the worst. I’d rather paint. But- it looks amazing when finished, so we kept on keeping on. This was removed with a combination of a heat gun, goo gone, and magic erasers. Lots of magic erasers.
We’d love to add a large Ball Camp logo to the front and back when finished taking off all of the decals.


The entire process was long and daunting, but we really really love how our “tiny house” on wheels turned out.
We love that we are able to take our children anywhere. We get to be weekend warriors and explore with them on the weekends, as well as plan big trips like the one we’ll be making at the end of this week to Maine. I can’t imagine having a better little place to call home. We just love it.
I hope you’ve enjoyed checking it out! Let me know if you have any questions on anything that wasn’t detailed here!


Love this so much! The process can be misery but the end result is so fantastic!
It looks great!
Your hard work paid off! It’s a BEAUTIFUL little home on wheels!
Thank you, I absolutely love it 😀 ❤. Hate the new 2022 look in the Jayco doing this!!!❤
It looks beautiful !
It looks amazing! I wish you rented it out!
I love it! Totally inspired to take on a project like this. But you guys seem to be very handy… Me, not so much!
Great job! Absolutely love it!
How much did the remodel cost? Looks great!
Hello and thank you! I think we spent somewhere around $500. The flooring was probably the largest cost, followed by the backsplash!
Love this!! I’m wondering what you used behind the master bed…is that a wallpaper? Thnx 🙂
Hi! Behind the bed we used 1×3 pine boards, and stained them. We then just used a nail gun to add them to the wall! It was fairly simple!
What was the brand and color of the flooring you used? Everything is beautiful!
Hi Bonnie,
The flooring is TrafficMASTER Allure 6 in. x 36 in. White Maple Luxury Vinyl Plank Flooring. Thanks for the comment!
How many do you think we will need we have an exact one will be taking on the same flooring and would like to see how much i will need to invest? Thanks
I’m sorry I don’t remember how many boxes of flooring we purchased as it’s been quite a while! I’d look at the box and see if it says how much space it will cover and then try to gauge how much square footage is in the camper. It’s not a lot!
We just bought this exact camper and have started ripping it up for our remodel! Yours is a great inspiration, so thanks so much for sharing! What size sheets did you use on the bunk beds? They seem to be odd sizes and I wasn’t sure what would fit.
Hi Kelly! Congrats on your Jayco purchase! I’m so glad we’ve been able to inspire you. The top bunk we used twin sheets, and the bottom are full. They are a little wide on the top bunk, but they are long enough, so I just tuck them in really well on the sides. Good luck with your remodel! I’d love to see some before/afters when you’re done!
Jamie
Great work, looks so clean and spacious. Is it necessary to sand the cupboards before painting? Did you apply the kitchen tiles on top of the wallpaper?
Hi Judy,
Thanks for your comments. I would highly recommend sanding the cupboards first prior to painting them. If you don’t, the paint may easily peel off. I sanded, applied a primer, and then the regular paint. The backsplash in the kitchen was applied directly over the grey paint. We painted all of the walls grey, and then applied the tiles to the wall.
Hope this helps!
Jamie
Thank you for posting all of this! I have found, with our little 17 ft Keystone Hideout, that interiors are rather cheaply made. The finish is already coming off the kitchen drawers. And the green fabricy part behind the bed doesn’t go well with our Virginia Tech theme. Your renovation will help me greatly in painting and creating a headboard. (Rick’s wife)
Awesome! I’d love to see your renovation! feel free to post a link!
What did you use for the backsplash of the bedroom? I looooove it
Thank you! We used 1×3 pine boards for the headboard behind the bed, and stained the boards different color. There wasn’t much to it, just picking different stains, and letting them set different amounts of time!
So, I noticed you replaced the light fixture above the table. It’s really cute! How did you know what type or size would fit? Got any suggestions for me? I have the same trailer, not exact model, mine is shorter (no bunks), but is a 2011 Jayco.
Hi~ We didn’t really know what size would fit. I don’t remember where I got the light but found a similar one here: https://www.industriallightelectric.com/products/industrial-lighting-mint-green-cage-light-ceiling-mount?variant=556833489 However, be aware, any light you get should have a switch on it to turn on and off. We didn’t think about this and had to add a switch to this light, making an extra step for ourselves! Any light with a switch that doesn’t hang too low should work. Just make sure to have it wired correctly if you don’t feel comfortable doing it yourself!
Another question: What the heck kind of screwdriver is used to get the cabinet hardware off? It’s not your standard flat head or phillips. I have a tool case but nothing I had fit.
The cabinet hardware just requires a square bit. It is different than a philips or a flat-head. We used our drill with a square bit on it- like this: http://www.homedepot.com/p/DEWALT-2-in-MAXFIT-SQ2-Bit-Tip-2-Pack-DWA2SQ2-2H/204786441. Hope this helps!
It’s adorable. We are doing ours. You don’t make the decals sound fun at all. That is about all we have left to do. Thanks for the inspiration.
Thank you! Good luck on your camper as well! I’d love to see what you did!
I’m remodeling ours but I’m having a hard time figuring out how to hand things on the walls. I want to replace the medicine cabinet in the bathroom with a mirror. What can I do?
I believe we just used a brad nail gun to hang our mirror and nailed it to the wall in all 4 corners. Maybe not the best method, but it worked because the mirror frame was wood.
I like this. We have a 2010 Jayco ( a 29-foot so the layout is different) and it is kind of brown and dark. I’ve never thought of repainting but yours is so bright and cheery now. I’m not sure about giving up that medicine cabinet space but it sure would make the sink easier to use! Maybe some little shelves on the side walls would help.
We’re retired so use ours quite a bit–we’ve hauled ours through 34 states (some of the several times) plus a 15000 mile trip through Alberta, British Columbia, and the Yukon Territory up the Alaska Highway and around Alaska. Want to go back to Alaska. Some brightening up might be in order. I do have a couple of questions: I see you took the window shades out. Did you replace them with something or are you just leaving the windows uncovered? (That won’t work in Alaska!) But I really don’t like the frames around the shades and would like to do something else. And was the new flooring just laid on top of the old? It sure looks like it would be easier to clean! There is carpet in the larger bedroom and it’s a pain to clean as there is no room to walk around the bed. This would be way easier.
Anyhow, I love the whole thing.
Wow! You guys have been all over! That is inspiring! We replaced the window shades with faux wood blinds. They still let some light in, but are better on the eyes than what was there before! And yes, the new flooring was laid right on top of the old flooring. It was very easy to cut and lay over the old floor. We didn’t have any carpeting though. Good luck with sprucing up your trailer! I’d love to see some photos after you’ve done it!
This is the best camper Reno I’ve seen, and I have reviewed many. Job well done!!!!!
Thank you so much Candice!
I have a 2007 Jayco..doing some reno myself..was wondering did you remove part of the walls to make the opening to the bedroom larger
Hi,
We did remove the half wall that was behind the couch. We also removed the couch that was there in front of the bedroom. Thanks!
Love this! Beautiful job! Exactly what I’m envisioning for our camper, now I have pics to show hubby so I can get started! Can I ask, where did you buy the divider curtains from for the master bed? (or the fabric if you sewed them). Thank you in advance!!
Hi Natosha- Thanks so much! I’m glad you love the camper. To answer your question- The curtains are from World Market! Have fun with your renovation!
Great, thank you 🙂
Your trailer is AWESOME!! I am so proud, and I don’t even know you!! LOL
Love it! Our family lives in the 2017 version of this model and earlier this week I took out our couch and half wall. We are planning to build in a window seat similar to yours with a hatch to stick our laundry basket in. I was searching for tips on painting trailer walls and came across your blog. I am somewhat jealous of the cabinets over your window seat! And after seeing the doors on the side of your dinette benches I just might have to cut in some on mine! Thanks for sharing.
Love this!! I have a Jayco as well and will be starting my reno very soon. Did you have to remove the wallpaper before painting, or did you paint directly over the wallpaper? How did the paint hold up in the bathroom? Thank you so much for sharing your process!!
Hi Melissa, Thanks for checking out our blog and camper! There was no wallpaper on our walls, it is more of a textured plastic wall. We did use a primer first, which I highly reccomend. I would not paint with a latex paint directly on the walls, because it will scratch off easily. (I tried this!) Use a good primer first, and then you should be good. The paint has not come off yet and it’s been two seasons now! Good luck with your renovation!
Wonderful! Thank you so much for getting back to me, Jamie!
I bought this exact camper and moved in after a minimal renovation. At the time I was interested in “tiny living” but wasn’t sure I’d like it. Five years later I am SOLD on tiny living, have no plans to go back, and am starting “round 2” of renovations. 2 questions:
1) your picts of the removed futon are so helpful as I want to do this as well but wasn’t sure what I’d find. How did you actually remove the futon itself? I can’t find any easily accessible bolts/screws to begin the process.
2) THAT HALF WALL. I want it gone. How did you remove it?!?
Great job on your reno. We live in Minnesota. My question for you is the planks on the wall in your bedroom. The liquid nail it do you know how it will hold up in the winters we have here. Our camper stays outside all year. We need to do a wall on our slide out due to water damage.thanks.
Hi Kari,
We are in Michigan and definately can relate to the cold winters. Our camper stay outside all year as well.
We didn’t use liquid nails in this case, just a brad nail gun. I can’t remember the length of the nails we used, but you’ll want to make sure they are not too long for obvious reasons. I had one board pop off after one year due to it warping/bending (likely due to the cold weather). I just re-nailed it and went back in fine. All other boards have held on fine with the brad nails. You could use larger gauge finish nails for additional strength. Hope this helps! Thanks for looking!
I also have a Jayco trailer and would love to remove the decals. Was there any difference in the paint? Was it faded?
Hi Melissa,
There was a very faint outline from the removal of the decals, and we only noticed it when the sun hit the siding at a certain angle. Over time this has faded away and we don’t notice anymore (and would probably go away faster with more frequent washes/waxes).
Thanks for question and for visiting!
What kind of paint did you use on the cabinets and walls and is it holding up well? What kind of prep did you have to do before you started painting?
Hi! Curious how you installed the wood on the base of the bed? The original material is super thin. This is a genuine inspiration! Thank you!
Hi Marena,
We use a brad nail gun with a short brad nail. The nail didn’t protrude through the material. You could also use liquid nails to glue them on, but that’s a little messier method.
Thanks for looking!
Any idea what the weight is now?
Hi Tim,
We haven’t had it weighed since the modifications. But I can’t imagine it being much difference. We added some flooring and some wood, but also removed the futon and built a bench. I would wager it might be 100lbs more than it was.
Thanks for stopping by!
Sorry if this is a repeat question, but what are the dimensions of the couch replacement bench?
Hi Cheryl,
Sorry for our late reply. I don’t have the exact dimensions at the moment. We basically just built it to fit that corner area. It the back bench comes to the same width as the cabinets next to it. And the right side bench comes out to same width as the divider wall. Underneath the bench, as you might know, is the furnace, so we built in some air vents to allow it to breathe. Hope this helps!
Hi did you paint the ceiling too?
Hi Sandra! We did not paint the ceiling. It was already white so we were fine with that.
Thanks for visiting!
Love everything about this–You did awesome. What type of tile did you use for the backsplash–I have seen the peel n stick type..will that work. Also,painting the cabinets–how hard is that? I see people using these products called Beyond Paint and I think somethign called NUZ. Finally–how hard is it to make a cover for the cushions–I can sew but not sure that well. I am great at making napkins–small squares with mitre corners…
NewbieUsed Jayco onwer… gtl@austin.rr.com
Hi Gina. Thanks for the compliment! The tile we used is the peel/stick kind. We choose this because that its light and doesn’t add much weight. Painting the cabinets was a chore. It’s just very tedious and takes a couple of coats to make look nice. And yes those products work great at creating a sticky base for your paint. I highly recommend something like that. My wife did the cushions and doesn’t have a lot of sewing experience. The underside isn’t as perfect if you were to have a professional do it, but we think it worked out well for our first attempt. We ended up using some no-sew adhesive strips on most the cushions and then just added some thread on the corners where needed.
Did your you use pallets above the bed? If so how did nail or screw then down?
Hi Erika,
We actually used pine boards. We stained them to look a bit more distressed. And we attached them with a finish nail gun. Just be sure to use the appropriate length nails 🙂
Hi this looks great! I want to remove my couch and continue the counter space to that corner. Can you tell me what screws you used to hold the framing to the floor and if I need to be worried about hitting any wiring or plumbing? Thanks!
Hi Colby. I’m not sure what size the screws were, but you might look at the screws you remove from the couch and use something similar. As long as you don’t go too deep, you shouldn’t have any issues with hitting anything. You might want to crawl under the frame and look just to be sure. I believe the fresh water tank is located close to where you are talking about. Also since you extending you counters, you may consider fastening to the wall rather than the floor. With screws into the wall and the weight of the counter, you will be pretty secure. Just a thought! Thanks for visiting!
Thank you for sharing your renovation process and photos. The end result is beautiful. I have the exact model, same year and everything). I have a key rack on the curbside wall in the master bedroom. I took it off to find that it concealed a hoped wire. Did you guys have this in yours too? If so, did you choose to leave it and paint over it or something else? Thanks again! Happy traveling 🙂
Good afternoon, can you use a paint and primer in one for painting? Or do you prefer primer separate. Thank you
Hello,
I do recommend a separate base primer, instead of a paint/primer in one.
Thank you very much. We are in the process of renovating. What did you guys do for the windows? Any window tint or anything? Thanks
Where did you get your dinette cushion covers from?
We covered the dinette cushions with fabric from Hobby Lobby.
Nothing on the glass. We installed blinds.
Hi – we just purchased a 2008 Jayco BH and on day one I took out the dinette, sofa and flooring and started priming everything. I’m just about through with the priming and painting and came across your site. I agree – the painting is quite tedious and required quite a few coats. I’m already loving the bright clean colors though so it’s completely worth it. Can I ask – now that it has been a few years how has the paint held up on both the cabinet and the walls? Thanks!
Hello, The paint has held up very well. We just touched up a few high traffic areas, but it held up great!
Looks so good! I have the same Jayco, with the exception of the big bedroom window. What was your process for painting the cabinets? I used a no sanding primer, not that great I still need to apply a few too many coats, I’m not done, any suggestions? One more thing, any recommendations for a goo, powerful shower head???
My husband & I own the exact trailer. We’ve been having conversations whether or not remodel the one we own or purchase new. Big decision… invest time & money or start over. We love what you’ve done & it makes the deciding so difficult! Cheers!
So cool, I have a question about the cushions, can you show or explain the process (The ones with the arrows)?
Hi There,
I just came across this post, as I am purchasing a camper of the same year and make as yours. Your renovations look AMAZING! I am wondering how the paint on cupboards and walls, and the wood on the walls stood up over the years. Can you please provide an update, comment, or post pics?
Thank you!
Hi Tara, Thanks for visiting! We actually have sold our camper, but I can tell you that paint held up fairly well for the most part. We had a few instances, more so on the cupboards, where we had to re-touch a nick or two. The walls surprisingly had no issue. If we had to do it all over again, I might consider adding a couple of coats of flat polyurethane to the cupboards. We have 3 boys and they can be rough on surfaces.
Hoping you enjoy your Jayco!
Hi! This is a lovely transformation. Well done. I love your flooring choice and would love to know how it held up. Were there any problems with buckling or separating of the planks? We are planning on replacing our flooring but are a bit hesitate at the investment and not being sure of the long range success. We only use our travel trailer for camping excursions so it is not temperature controlled by any means. Thank you and again, beautiful work. Doug
Hi! Thanks so much! Ours was not temperature controlled either, and we did notice slight seperating of the planks when it was cold, but they would go back together in the heat. Not enough for it to bother us! It held up well!
Hi, I’m late to the party (as usual). We have a similar Jayco TT and are starting to do some renovations. Do you recall of yours had a fabric headboard originally? If so, do you remember how you removed it? I can’t find any obvious screws and am Leary of just pulling on it for fear of putting a big hole in the wall. Thanks for your advice!
I don’t believe ours had a headboard of any kind. We just added the weathered/stained wood to the wall behind the bed!
Beautiful. We busted purchased a 2004 Jay o in great shape but dated. Going up to the lake this weekend and tearing out the sofa. Thank you for the inspiration. Great job.
Thank you so much!
Your reno is STUNNING but I’m commenting because I’m even more stunned at the time and consideration you’ve taken when responding to your dozens of comments and every single response is also filled with gratitude and lovingkindness! HOORAY! ❤️
Thank you Kelly! We appreciate you stopping by!
Hi, what did you use for the couch cushions?
I’m just curious why did you take the decals off the outside? We bought the same camper also. What size foam did you use for the cushions on the dinette set and the bench you made? Also did you have to replace any paneling in the ceiling or walls? We’d like to replace some on the ceiling and wondering how hard it was. Also, what size nails did you use for behind the bed with the wood panels
Great Job!! We have that camper with the exception of the cabinet in the bunk area!! Ours was ugly brown as well. I had the walls painted a light turquoise and added great bedding , window valances, shower curtain and great art. Did not paint cabinets, we have two big dogs bustling about, they would have trashed the new paint job. You did great!!!
This is awesome! I have similar BH JF and have the same stuff ripped out in the first set of pictures however unsure whether to remove floor furnace, (live in TX) since the floors have to be redone anyways. Was wondering how your roof is holding up and how you are keeping up with it?
Thanks again this is truly inspiring!